

In these days where it’s harder to visit friends and hang out, we’re all turning to online solutions to keep us sane. We’ve already covered how you can watch YouTube videos simultaneously with friends online, but what about music?
None of the major subscriptions seem to offer any kind of group or party experience, but there are some services available that can let you chill out with mates and spin some tunes. We explore how to listen to music with friends online.
How to create a listening room with JQBX
Back in the early 2010s there was a bit of a fad for ‘listening rooms’. These were online portals that allowed people to enjoy their music libraries in real-time with others on the internet. Skip forward a decade and many of the big players back then, such as Turntable.fm, have disappeared but there are still a few apps that can make a virtual party a reality.
You can use JQBX (pronounced jukebox), OutLoud or Jukestar, but for this tutorial we’ll show you how to get up and running with JQBX. It’s available on iOS, Android, macOS and via a web portal. You’ll also need a Spotify Premium account, as will any guests who join the party, otherwise the app is free to use.
Getting started with JQBX
You can use JQBX on a number of devices, but for this tutorial we’ll focus on the web portal as it allows anyone to access the service. The steps are very similar on the mobile and macOS app though, so most of the steps should still apply.
Go to the JQBX site and click on the Log in to the web app button. You’ll now be asked to connect JQBX to Spotify, so click the Log in with Spotify button, enter your account details and click the Agree button.

With this done you’ll be greeted by a pop-up box welcoming you to JQBX. Take a look at the instructions to familiarise yourself with the options, then click anywhere outside the box to close it and start using the service.
The main interface shows the most popular rooms that are currently open. You can join one of these if you like, but the option you’ll want to click on is Create Room, which you’ll find in the top left corner of the screen.

On the next page you’ll be able to set up the conditions for your room. First, give it a name, then select whether you want it to be public or private. We recommend the latter as it means you can control who joins the party. Selecting this makes the Password box appear, so create one that you can share with your friends when you send them the invite.
Underneath you’ll notice a box marked Optional. This can be expanded so that you set the maximum number of DJs (people who can select songs) and various other settings. For the time being, we suggest just leaving this as it as and going straight to the Want to invite friends? box.
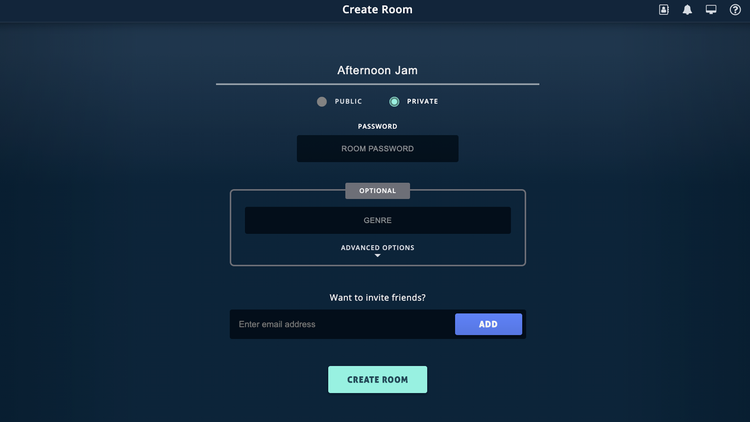
Enter the email addresses of people you want to join your room here, and they will be sent an email with the link once the room is up and running. You can also invite them from controls within the room, so there’s no need to worry about it too much now. To finish the process, click the Create Room button and you can start spinning those discs.
Using the Listening Room in JQBX
When you first create a room, the interface looks pretty sparse. On the left is the Queue column, but this will be empty but you can use the Search option to find songs or click the Sync button to link to the JQBX:: playlist that was automatically created when you linked your account (more on this in a minute).

The upper section of the central pane tells you that there are no DJs, so it seems the evil will of The Smiths’ Panic has come to pass. You can rectify this by clicking the Be a DJ button, but read on first. In the lower section you’ll find the Chat window, with the text box along the bottom. Finally, on the right there’s the list of current guests and the dial at the top where you can vote on songs by clicking the thumb icons.
To begin, you’ll first need to have at least one track in your playlist, so click the Search button and type a track name into the search field at the top of the section. A list of possible matches will appear, and you can click the little + symbol to add them. With a few in your list, it’s time to take control of the decks.

Click the Be a DJ button and the song at the top of your playlist will start to play. This will continue until one of your guests joins and click the Be a DJ button on their screen. From this point on, control will switch from one to the other as each song ends, giving everyone an even amount of turns.

You can fill your list with individual songs or select from the existing playlists on your Spotify account. JQBX also create custom playlists when you connect your account, so you can add songs to create a new collection or Star songs while on JQBX and they’ll be automatically added to the JQBX :: Starred playlist.
There are various other features you can explore with JQBX, but you should be able to explore those the more you use the service. In the meantime, enjoy the music with your friends. To see what alternative there are to Spotify, also take a look at our guide to the best music streaming services.
Author: Martyn Casserly, Contributor

Martyn has been involved with tech ever since the arrival of his ZX Spectrum back in the early 80s. He covers iOS, Android, Windows and macOS, writing tutorials, buying guides and reviews for Macworld and its sister site Tech Advisor.